Menu
-
- Valentine's Gifts
- Lunar New Year Gifts
-
Shop Gifts By Age
- Gifts For a 0-6 Month Old
- Gifts For A 6-12 Month Old
- Gifts For A One Year Old
- Gifts For A Two Year Old
- Gifts For A Three Year Old
- Gifts For A Four Year Old
- Gifts For A Five Year Old
- Gifts For A Six Year Old
- Gifts For A Seven Year Old
- Gifts For An Eight Year Old
- Gifts For A Nine Year Old
- Gifts For A Ten Year Old
-
Shop Gifts By Budget
- New Arrivals
-
Toys
- Large Active Toys
- Animal Toys
- Arts & Crafts
- Award-Winning Toys
- Bath Toys
- Birthday Wishlists
- Building Toys
- Cars, Trains, & Trucks
- Games
- Instruments
- Loose Parts Play
- Loot Bag Toys
- Made in Canada
- Outdoor Toys
- Pretend Play
- Puzzles
- Sensory And Fidget Toys
- Sensory Bin Tools & Fillers
- STEM Toys & Activities
- Toronto-Themed Gifts
- Travel Toys
- Wooden Toys
- Waiting Room Toys & Furniture
-
Montessori Materials
- Montessori At-Home Program
-
Montessori Furniture
-
Bundles & Sales
-
Books
-
Shop By Age
-
Shop By Brand
-
Brands A-F
- 3 Sprouts
- 4M
- Ark Therapeutic
- Avenir
- B. Toys
- Bamboo Switch
- Beleduc
- Bob Books
- Brio
- bug + bean
- Carpets for Kids
- Cherrypick
- Children's Factory
- CJECOPLAY
- Clixo
- Connetix Tiles
- Crayola
- Creativity For Kids
- Crocodile Creek
- DJECO
- Educare
- Educational Insights
- Educo
- eeBoo
- Erzi
- ezpz
- Fat Brain Toys
- Fidget Company
- Foundations
- Brands G-L
- Brands M-R
- Brands S-Z
-
Brands A-F
-
- 866-901-4696
- Gift Registry
- Login

Taste-Safe Sensory Bins For Toddlers (and Older Children!)
4 min read

While not technically Montessori, you can find sensory bins in many Montessori classrooms.
They're great for sensorial exploration and can be very calming for children.
They're also just a fun way to develop pouring skills, fine motor coordination, and creativity.
What Are Sensory Bins?
Sensory bins are typically just a plastic tub or a large container, filled with materials that will stimulate the senses. They can have a theme, like Valentine's Day (shown in the image below), or they may just include loose materials for scooping, pouring, and mixing.

How To Make a Sensory Bin
Sensory bins are incredibly easy to make. They can really be made from so many different materials.
Start by choosing a container that’s large and shallow enough to encourage movement. A large, shallow rubbermaid bin or tupperware container works well.
Next, choose a base material. Popular choices include coloured rice, pasta, sand, or dried legumes but this article is about taste-safe options, so scroll down to use those instead.
You can also pick a theme you for your bin (i.e. colours, nature, seasonal (i.e. winter or Christmas), space, cars, animal figurines, letters, etc). You can choose anything your child is interested in.
Lastly, add some tools for scooping, pouring, mixing, dumping, patting, squishing, etc.
Examples of tools would be tweezers, spoons, tongs, small bowls, measuring cups, eyedroppers, an ice cube tray, etc.
Click here to see our Wooden Sensory Bin Toolkit.
Click here to see our Helping Hands Fine Motor Tool Set.
TOOBs or other animal figurines are also great additions.
Natural Food Colouring
Since these sensory bins are taste-safe, you may want to use all-natural food colouring too.
You can find natural food colouring at some grocery stores or make them by juicing colourful fruits and vegetables, i.e. carrot juice, beet juice, cranberry juice, spinach juice, blueberry juice, etc. You can also use strongly coloured spices mixed with a bit of vinegar, like turmeric, matcha, and paprika.
Often the natural food colours aren't as vibrant but they will still add colour to your base.
Chickpea Foam
This is a great sensory bin filler to make when you’re planning to cook with chickpeas. All you need is the liquid from a can of chickpeas.
It's a fun substitute for shaving cream or bubbles because it's light and foamy.
I this version, I used blue food colouring and added the figurines from the Penguins TOOB.


Ingredients:
- 2 Cans of chickpeas
- Food colouring
- ½ tsp of cream of tartar (optional)
Materials:
- Can opener
- Mixing bowl
- Hand or stand mixer
How to Make it:
- Pour the liquid from two cans of chickpeas into a mixing bowl.
- Add food colouring (5-10 drops).
- Optional: Add 1/2 tsp of cream of tartar (helps to keep foam foamy).
- Beat the liquid for approx. five minutes or until foam has formed.
Mushy Peas

Ingredients:
- Frozen Peas
- Warm water
Materials:
- Bowl
How to Make it:
- Pour frozen peas into warm water and give them time to thaw.
- Mash the thawed peas.
Note: Thawed frozen peas are recommended rather than raw peas because they get soft and mushy as they thaw. Raw peas can be a choking hazard.
Cooked Pasta
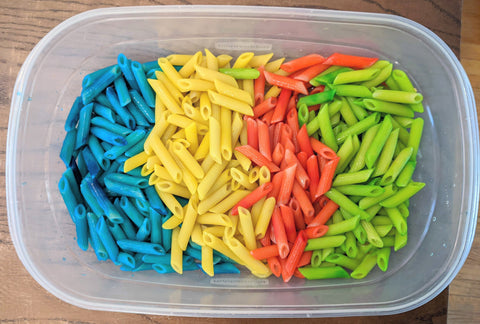
This is a great way to use leftover pasta. The texture is great for children that enjoy squishy textures, like mud.
Ingredients:
- Spaghetti
- Food Colouring
Materials:
- Pot
- Colander
- Large Freezer Bag
- Tray (or covered surface for drying)
How to Make it:
- Boil the spaghetti until soft.
- Drain the pasta in a colander and rinse until you can no longer feel starch.
- Let the pasta cool.
- Once cooled, put the pasta in a freezer bag and add food colouring. Toss and mix pasta and food colouring until all the pasta is coloured. Note: You can make one colour by doing this step once, or make a rainbow of colours with additional freezer bags and colours.
- Spread the coloured pasta onto the tray (or covered surface) and dry for a minimum of 1 hour.
Edible “Sand”
This is a great way to use up stale cereal, crackers, or bread (toasted).
In this version, I used stale Saltine crackers and added the figurines from the Wild TOOB.


Ingredients:
- Cereal, Crackers, or Toasted Bread
Materials:
- Blender (you can also blend by hand by breaking them apart with your hands or putting everything in a sealed freezer bag and crushing them by rolling the rolling pin over it)
How to Make it:
- Blend/crush the cereal, crackers or cookies until a sand-like consistency is achieved.
Note: you can use lighter coloured crackers for sand or darker, chocolate coloured cookies/cereal for dirt.
No-Prep, Taste-Safe Fillers
You can also use water, oats, cornmeal, whip cream, or scarves/swatches of fabric/felt. All you need to do is add them to your container, no prep required!
Also note that there are a few “taste-safe” recipes out there that use raw flour but raw flour should not be ingested. Bake the flour on a lined cookie sheet at 350 for 5 minutes (or until it reaches 160 degrees), let it cool and then it is safe for a child to explore with all of their senses.
Join Our Montessori Community
Sign up to get weekly activities, free printables, Montessori parenting guidance, and so much more.
Plus, get $10 off your first order of $100+.
Like this article? Get new articles, weekly activities, free printables, Montessori parenting guidance, and so much more.
One mom recently shared:
"Your newsletter is always SO great. It is one of the few I open and read weekly. You provide so much value. Thank you!"



![Kidamento Kidamento Children's Cameras [3 Models]](http://themontessoriroom.com/cdn/shop/products/kidamento-childrens-cameras-3-models-661353_1600x.png?v=1699075281)
