Menu
-
-
Shop Gifts By Age
- Gifts For a 0-6 Month Old
- Gifts For A 6-12 Month Old
- Gifts For A One Year Old
- Gifts For A Two Year Old
- Gifts For A Three Year Old
- Gifts For A Four Year Old
- Gifts For A Five Year Old
- Gifts For A Six Year Old
- Gifts For A Seven Year Old
- Gifts For An Eight Year Old
- Gifts For A Nine Year Old
- Gifts For A Ten Year Old
-
Shop Gifts By Budget
- New Arrivals
-
Toys
- Large Active Toys
- Animal Toys
- Arts & Crafts
- Award-Winning Toys
- Bath Toys
- Birthday Wishlists
- Building Toys
- Cars, Trains, & Trucks
- Games
- Instruments
- Loose Parts Play
- Loot Bag Toys
- Made in Canada
- Outdoor Toys
- Pretend Play
- Puzzles
- Sensory And Fidget Toys
- Sensory Bin Tools & Fillers
- STEM Toys & Activities
- Toronto-Themed Gifts
- Travel Toys
- Wooden Toys
- Waiting Room Toys & Furniture
-
Montessori Materials
- Montessori At-Home Program
-
Montessori Furniture
-
Bundles & Sales
-
Books
-
Shop By Age
-
Shop By Brand
- Brands A-F
- Brands G-L
-
Brands M-R
- MagicPlaybook
- Magna Tiles
- Make Believe Ideas
- Makedo
- Manhattan Toys
- Math for Love
- Milaniwood
- MindWare
- Mojo Toys
- Moluk
- Moulin Roty
- Native Northwest
- nic
- Nienhuis
- Ooly
- Opinel
- Ostheimer
- Papoose
- Peaceable Kingdom
- Plan Toys
- Plus-Plus
- Preschool Collection Watches and Timers
- Ravensburger Puzzles
- Real Life Pages
- Brands S-Z
-
- 866-901-4696
- Gift Registry
- Login


How to Teach Your Child to Wipe & Blow Their Nose
3 min read
In Montessori classrooms, children are taught how to wipe and blow their own noses in the toddler years.
Toddlers, and even preschoolers and kindergarteners, will likely still need help sometimes. The key is to give them the tools to do it for themselves first, and then you can offer assistance to finish the job, if needed.
All you need is:
- a mirror at your child’s height
- a box of Kleenexes next to it
- an accessible trash can.
Some classrooms will cut the tissues in half to suit the size of a young child’s hand better, but in my experience, the more tissue the better, especially during those first few (dozen) lessons :)
The learning process can take a while, and encouraging young children to do this for themselves can be quite messy at times, but it’s worth it.
As we’ve said many times, learning new skills takes repetition and opportunities to practice.
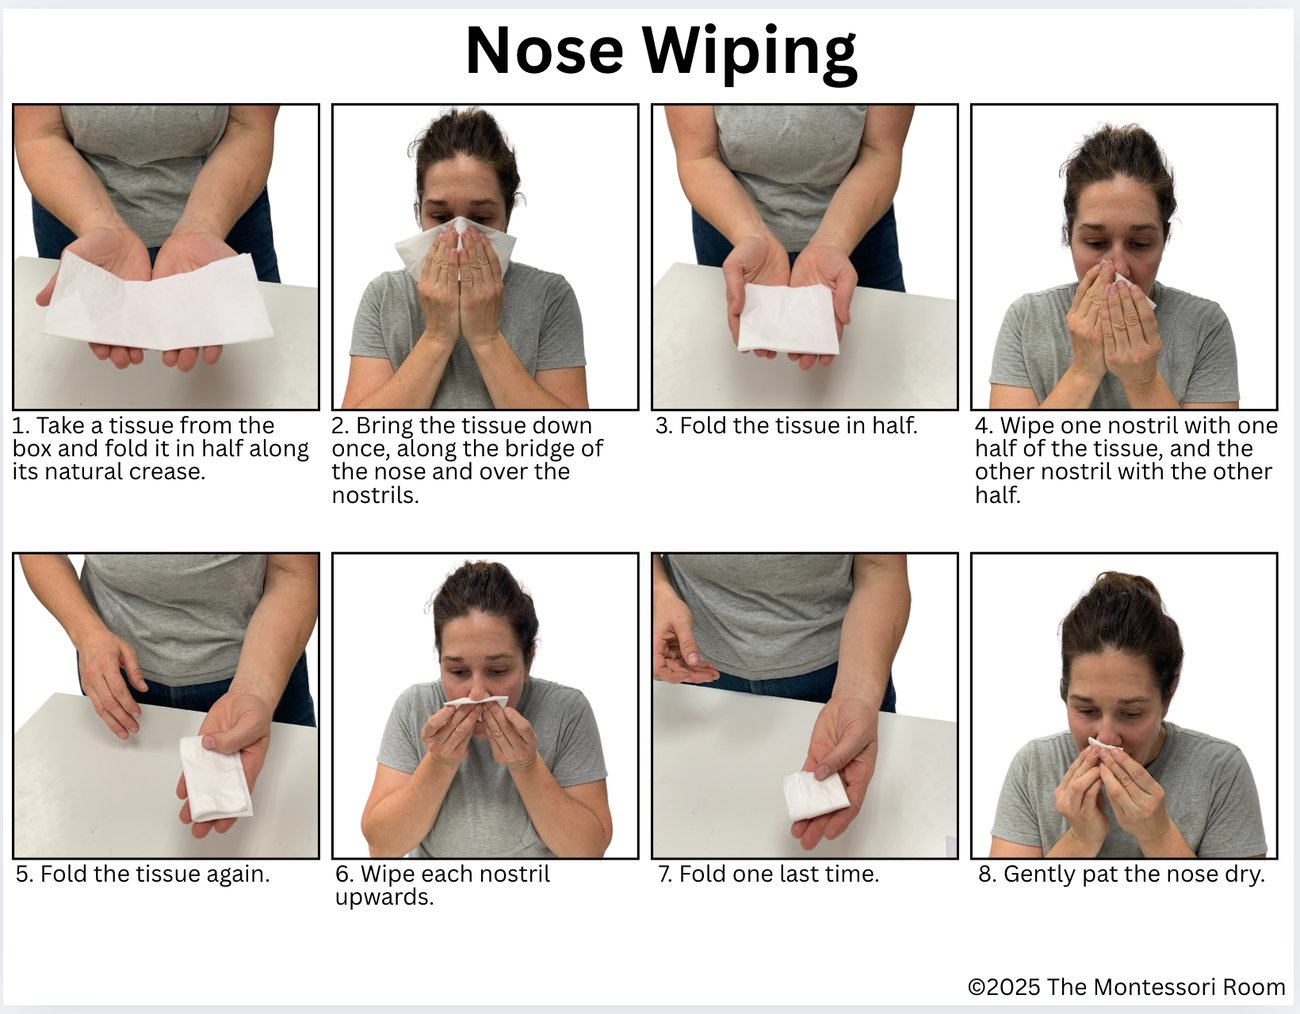
Step-By-Step Instructions: How To Teach Nose Wiping
We start with wiping the nose because it’s easier.
Blowing your nose requires a lot of coordination, like learning to stop breathing from your mouth and direct air only into your nose. We do it unconsciously as adults, but that’s a tricky thing to learn.
-
Invite your child to sit or stand in front of a mirror.
Tip: The first few times, draw their attention to the areas of their nose that need to be wiped so they can better understand the purpose, i.e. to remove the mucus from their nose and face. - Take a tissue from the box and fold it in half along its natural crease.
- Lay the tissue flat across both palms.
- Bring the tissue down once along the bridge of the nose and over the nostrils.
- Fold the tissue in half.
- Wipe one nostril with one half of the tissue, and the other nostril with the other half.
- Fold the tissue again. Wipe each nostril upwards.
- Fold one last time and gently pat the nose dry.
- Place the used tissue in the trash can.
- Wash hands.
Click here to download the visual printable.
Tip: Make handwashing part of the lesson so that it becomes a habit to always wash their hands after blowing their nose. Click here for step-by-step instructions on how hand washing is introduced in a Montessori Classroom.
It’s also worth noting here that toddlers will rarely folded the Kleenexes like in the demonstration. The folding part is challenging, but each child will find their own method, usually balling it up, but it'll get the job done.
Do This BEFORE Teaching Nose Blowing
Before your child learns to blow their nose, you have to teach them how to push air out of their nostrils. You can do this in a few fun and simple ways:
-
Model Nose Blowing: Show the child how you blow your nose.
To grab their attention, you can make it fun and do it in a silly or exaggerated way. The goal is for them to see and hear what it looks like, and then invite them to give it a try.
- Feather or Tissue Game: Invite the child to blow on a feather or tissue with their mouth to make it move or ‘dance’.
Then invite them to try again, this time keeping their mouth closed and letting the air come out of their nose. - Fog the Mirror: Invite the child to stand in front of a mirror and “make fog” with their breath.
First with their mouth, then by blowing gently through their nose.
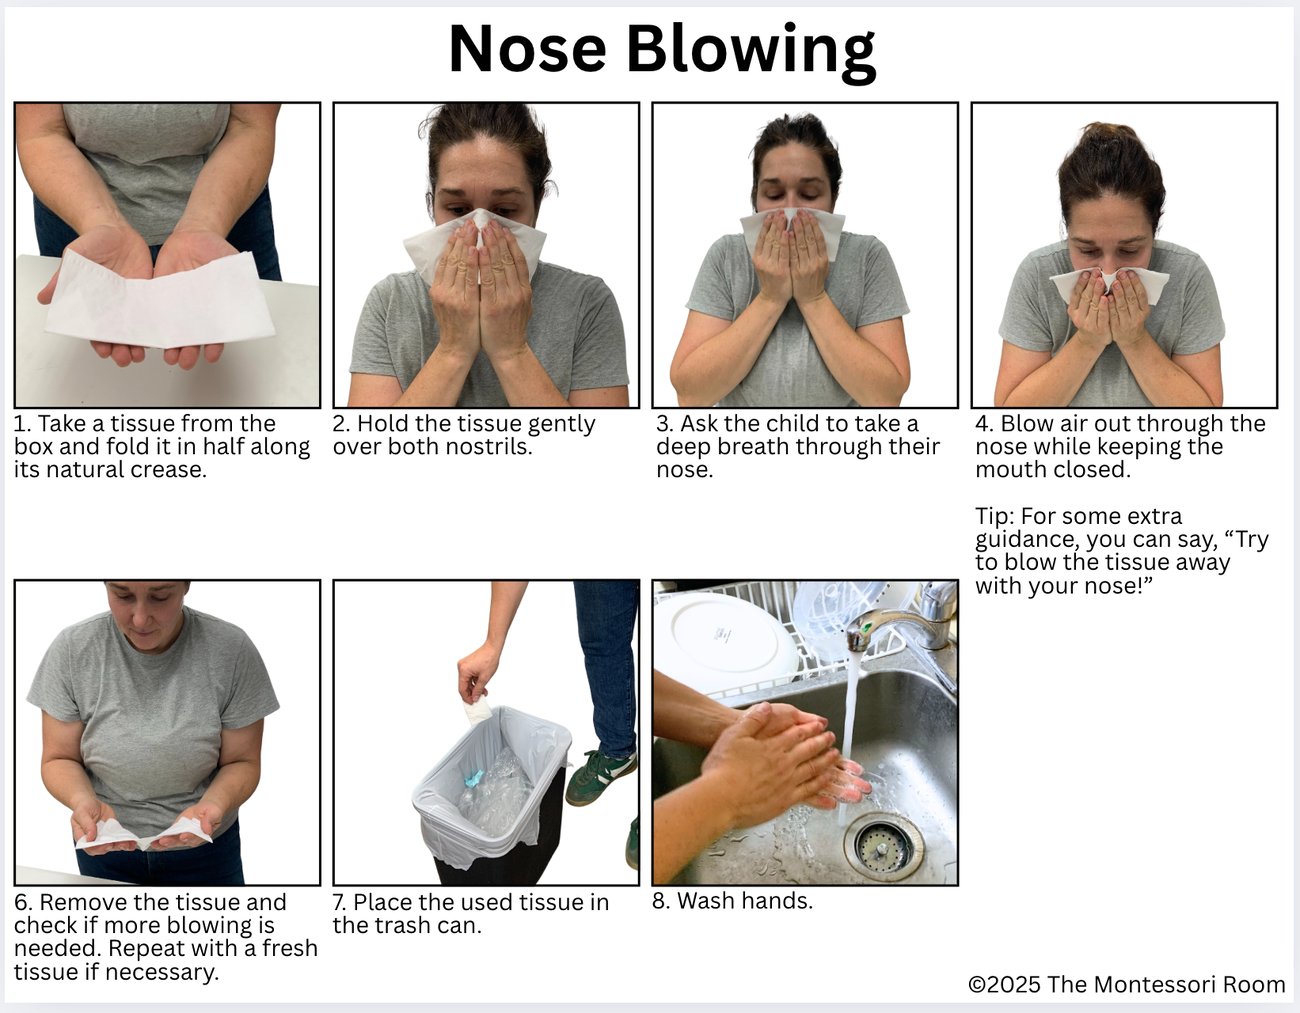
Step-By-Step Instructions: How To Teach Nose Blowing
- Invite your child to sit or stand in front of a mirror.
- Take a tissue from the box and fold it in half along its natural crease.
- Lay the tissue flat across both palms.
- Hold the tissue gently over both nostrils.
- Ask the child to take a deep breath through their nose.
-
Then encourage them to blow air out through their nose while keeping their mouth closed.
Tip: For some extra guidance, you can say, “Try to blow the tissue away with your nose!” - Remove the tissue and check if more blowing is needed. Repeat with a fresh tissue if necessary.
- Fold the tissue to use a clean part and gently wipe away any remaining mucus.
- Place the used tissue in the trash can.
- Wash hands.
Note: this shouldn’t be a “today I’m going to teach my child how to wipe their nose” activity, it should happen naturally. The best way to introduce this activity is to become familiar with the steps and then when your child needs to wipe their nose, show them how.
Join Our Montessori Community
Sign up to get weekly activities, free printables, Montessori parenting guidance, and so much more.
Plus, get $10 off your first order of $100+.
Like this article? Get new articles, weekly activities, free printables, Montessori parenting guidance, and so much more.
One mom recently shared:
"Your newsletter is always SO great. It is one of the few I open and read weekly. You provide so much value. Thank you!"


