5 Fun Hanukkah Activities for Kids

Hanukkah (Chanukah) is only a couple of weeks away, beginning on the evening of Sun, Dec 14.
And while our family doesn't celebrate Hanukkah, learning about different cultures and religions is one way to help raise anti-racist children, as Britt Hawthorne explains in her book, Raising Antiracist Children.
For other families that don't celebrate, here are a few quick facts to help your family learn more about this holiday:
- Hanukkah is an eight-day Jewish holiday that celebrates a special miracle. A long time ago, a small amount of oil in the temple lasted eight whole days, even though it should have only lasted one! National Geographic Kids has a great explanation of the history, which can be found here.
- Hanukkah usually happens in late November or December. In 2025, it will start on the evening of December 14 and end on the evening of December 22.
- During Hanukkah, families light the menorah, a candle holder with nine branches. One candle is lit on the first night, and a new candle is added each night until all eight are burning. The ninth candle, called the shamash, is used to light the others.
- People also play games with a spinning top called a dreidel, eat special foods fried in oil like potato pancakes (latkes) and jelly donuts (sufganiyot), and sometimes give small gifts.
- The candles, games, and foods all help people remember the miracle and celebrate hope, family, and joy.
We also put together some fun crafts, colouring pages, Montessori activities, and an EASY child-friendly recipe.
Activity 1: Make a Menorah
Why it’s important
The Menorah is a special candle holder with nine branches. Eight of the candles stand for each night of Hanukkah, and the ninth, called the shamash, is the “helper” candle used to light the others.
A long time ago, the Maccabees - a group of brave Jewish people who worked to protect their traditions - cleaned and reopened the Temple after it had been destroyed. They only had a tiny bit of oil to light the Menorah, but it lasted for eight whole days! Lighting the Menorah each night helps us remember this miracle and celebrate hope, light, and the happiness of Hanukkah.
Make a Menorah - Version 1:

Ages: 18 months and up
Materials Needed:
- 9 Cardboard Tubes
- 8 x Toilet Paper Rolls for candles
- 1 x Paper Towel Roll for Shamash
- Yellow and/or Orange Tissue Paper
- Art medium of your choice, i.e. paint, markers, crayons, etc.
Instructions:
- Invite your child to decorate the cardboard rolls with the art medium of their choice. Tip: This is a lot to decorate, so I would recommend doing this over a few days or working on it as a family.
- When they’re finished, line up the rolls with the taller one (shamash) in the middle and 4 shorter ones (candles) on either side.
- Put sheets of yellow and/or orange tissue paper in a basket for your flames.
- “Light” the shamash first by stuffing tissue paper into the top of the roll so that it looks like a flame.
- Use the shamash to then “light” the candles on each night of Hanukkah.
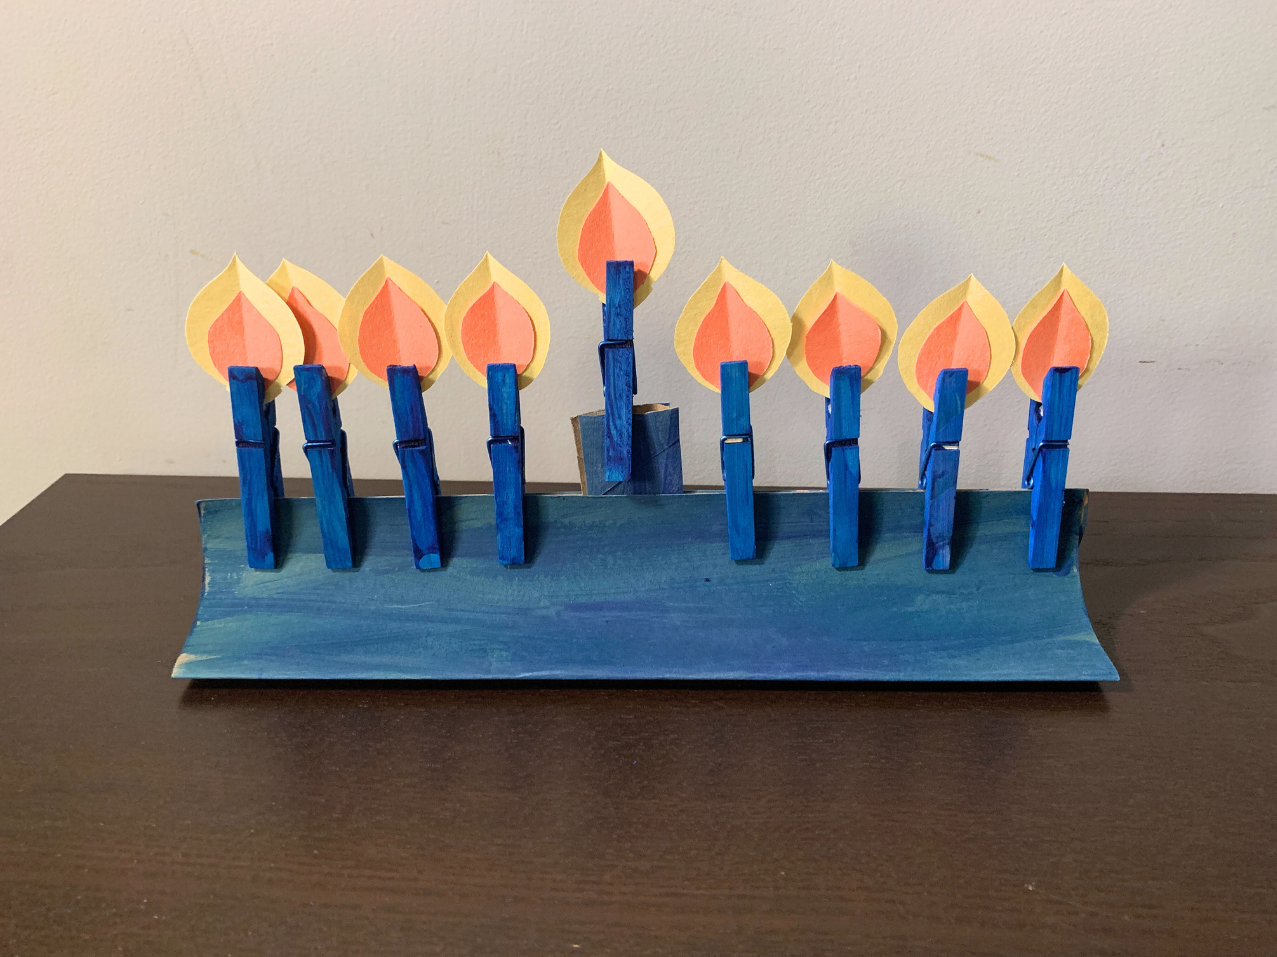
Make a Menorah - Version 2:

Ages: 3 years and up
Materials Needed:
- 9 wooden clothespins
- Art medium of your choice, i.e. paint, markers, crayons, etc.
- Piece of Cardboard - min. 25 cm x 14 cm.
- Flame template - 9 flames to colour and cut out
- Scissors
Instructions:
- Invite your child to decorate the piece of cardboard and clothespins with the art medium of their choice. Tip: This is a lot to decorate, so I would recommend doing this over a few days or working on it as a family.
- To make the base, fold the long sides of the cardboard in toward each other. Press down so the base is flat. Make clear creases so it will sit steady on the table.
- Attach the clothespins to the base so the clip side is up. These will hold the flames.
- Colour, cut out, and clip the flames onto the top of each clothespin. Each night, the child can add a flame to “light” the menorah.
If you’re looking for an even easier activity, click here to download our Menorah Decorating Pages.
Activity 2: Hanukkah Language Cards

Ages: 18 months and up
These cards can be used in different ways, depending on your child’s language development:
- For younger children (18 months +): to build and enrich vocabulary.
- For older children (3 years +): to build vocabulary and support early literacy skills.
We've also included information on the meaning behind each symbol to help make the cards more meaningful, as well as enhance the child’s knowledge of Hanukkah.
Click here to download the Hanukkah Language Cards.
Activity 3: Hanukkah Clothespin Cards

Ages: 3 years and up
In a Montessori classroom, an activity like this would be done with clothespins, where the child clips the clothespin over the correct number symbol.
This is a great way to add fine motor development into the activity.
You can also do the activity by simply having your child circle the number with a pencil or marker.
Click here to download the Hanukkah Clothespin Cards.
Activity 4: Hanukkah Cutting Work

Ages: 3 years and up
These cutting sheets are great because they're less messy than cutting strips that leave lots of little bits of paper.
Children can cut along the dotted line until they reach the object.
Click here to download the Hanukkah Cutting Work
Activity 5: Recipe - Marshmallow Dreidels

Ingredients:
-
Large marshmallows
-
Pretzel sticks (for the dreidel handle)
-
Tube of blue gel frosting
Instructions:
-
Make the dreidel shape:
Stick a pretzel stick into the top of each marshmallow. This will be the dreidel’s handle. -
Decorate the dreidel:
Use blue gel frosting to draw one of the Hebrew letters on each side of the marshmallow: Nun (נ), Gimel (ג), Hey (ה), or Shin (ש). -
Play or eat:
You can use the marshmallow dreidels to play a gentle dreidel game (just spin carefully!) or enjoy them as a sweet Hanukkah treat.
Tip: If you want the dreidel to spin better, “glue” a Hershey kiss to the bottom of the marshmallow with some of the frosting.


![Kidamento Kidamento Children's Cameras [3 Models]](http://themontessoriroom.com/cdn/shop/products/kidamento-childrens-cameras-3-models-661353.png?v=1699075281&width=1600)
![Kidamento Kidamento Children's Cameras [3 Models]](http://themontessoriroom.com/cdn/shop/products/kidamento-childrens-cameras-3-models-661353_2000x.png?v=1699075281)